0

Review of my Installation

The project turned out a lot better than I had hoped. By utilising the whirlpool interactive cycle of constant testing and modifications I managed to keep close to my aim while making subtle tweaks to improve it; such as making the eyes have a blue edge, and the project surpassed my original expectations. I also have enjoyed learning processing, I feel I managed to overcome something complex very quickly and pull out great results. Unlike other code I have learnt this was quite straight forward with not much mark up that makes it easier to break down and understand as well as find where there are errors.

If I was to continue this project on I would love to manipulate more paintings using this and put them all in a room as I feel this would be effective. I would also consider making the room a living room and hanging it up as then the privacy issue is at home which makes it more striking.

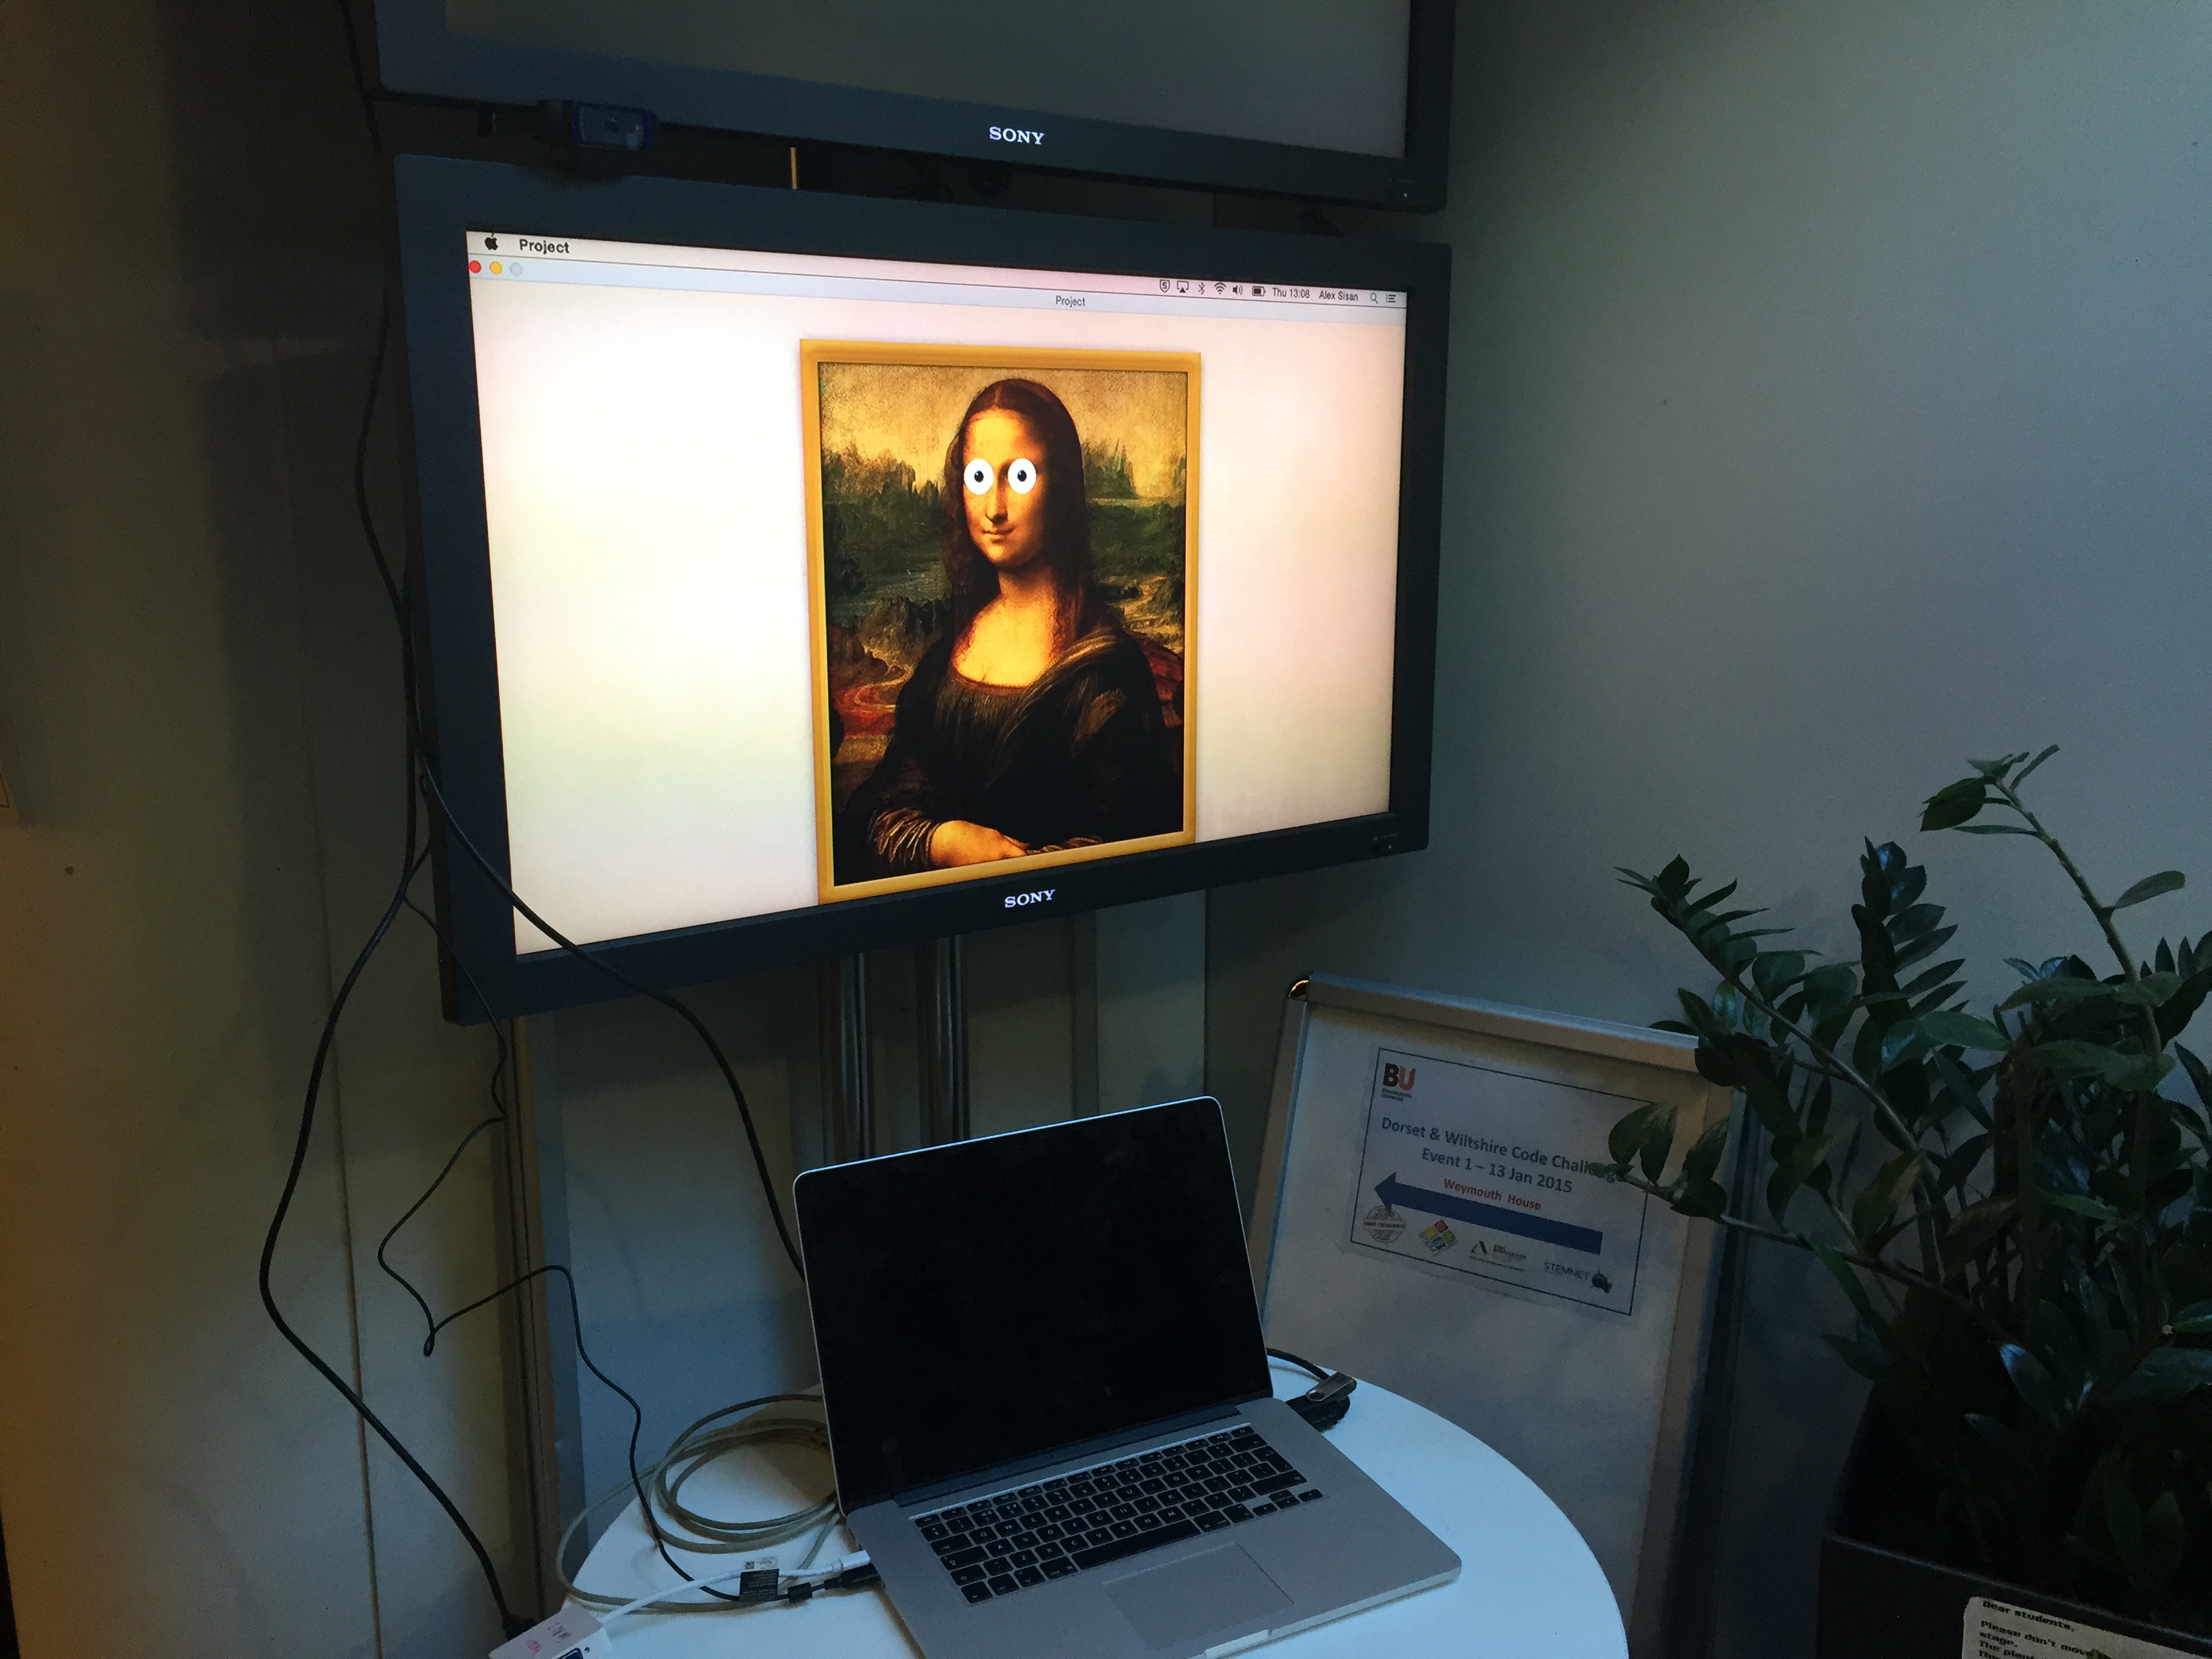
Due to the space too I was limited, I would have loved to have turned the screen around and bought a frame so the painting was bigger and looked realistic as opposed to a virtual frame. I feel this would have had more of an impact and made my project look better but sadly due to the space and money I couldn’t do this. This is very little in comparison to my project as a whole though as I did exactly what I set out to do and it had the impact and look that I wanted making me very, very pleased with how it panned out in the end.


In relation to the theory I am thrilled with the outcome. The panipticon is all about the privacy aspect and the moving eyes capture this. As people walked through the space the eyes tracked them as if a camera. This was exactly my intention and I feel it worked really well in proving this point about the security and “all seeing” aspect of the world as it is now.

0

Final testing of my installation

Today I tested the final version of my project upon my friends and family. I wanted to gauge a reaction and see if everything worked as it intended as it would in the space. This was very successful, it engaged the audience and made them smile/laugh as they participated with the installation. Unlike the space of the Weymouth House atrium the audience had more time to take in the piece and I this allowed me to test the project more.

My eyes worked as intended, they didn’t go through any problems as previously encountered; with duplicate pupils, and they recognised the faces and moved accordingly to their limits. I am pleased with how it came across and the audience’s reaction to the project. I am even happier that the project worked as intended and how I first visualised the project when coming up with the ideas. One of the testers said “it worked really well and it was a bit creepy how she followed you” and how they touched upon the following showcases that my theory strongly came through and provoked a reaction related to privacy.

A video of the project in action during the final test

0

Additional Testing

After testing in the environment I then went away and looked at what could be achieved and any additional improvements. As I based it off of movies and people cutting the eyes out of paintings I looked at maybe making this style. However cutting out the of the painting and having smaller eyes moving around this space made the Mona Lisa look possessed and the project less comical; in which I had very positive feedback about. The look given wasn’t something that I felt worked and detracted from the eye movement that is the core attraction of the installation. While the idea worked in theory it didn’t seem to have the same effect on the audience or the same look as the more comical, oversized eyes overlaid.

Untitled-1

The modified eyes to look more like realistic makes the installation “horror-esque”

However I did tweak around with the limitations after a suggestion from my tutor to make the eyes move less so it feels like it is looking more at the person all the time. Halving the limit so the pupils only come half way out of the centre of the eyes did just this and improved my project in my opinion. It felt like the Mona Lisa was looking at the subject than in their general direction.

Untitled-2

The new limitation on the eyes makes the Mona Lisa look like she is looking more at the user

0

Testing the Installation in the Space

Today was the day I tested my installation in the space. While everything worked at home and I was hopeful it would work in the space I was very nervous in case the code fell over itself at the biggest hurdle. Thankfully though it didn’t and it ran smoothly.

The only issue I had was that while I anticipated the screen resolution to be 1080p they were actually 720p meaning I had to do some quick fixes to the size of the image and the positioning/size of the eyes. This was no problem though and only took 5 or so minutes to sort out and thankfully I had pre-anticipated this by making it in 1080p and I didn’t suffer any quality loss because of this.

The project didn’t look out of place in the space and many people came up to try it out or glanced at it as they went past it. Many were seen moving and swaying as the Mona Lisa followed them around and smiled/laughed at the sight of the comical eyes placed upon the famous painting. The feedback and positivity around my installation in the space meant that I feel it did its job. When asked to give a review of the painting people said it “looked cool” and was “very fun”. With feedback like this I feel I have done my job with the project and I am happy with the outcome.

However looking back upon the videos and pictures I had taken I realised the camera positioning was too high as the eyes looked down a lot like they weren’t looking at the people or looking down upon them in a condescending manner; in which is pretty funny to think about but not what I was after. I feel picking the other screen above it would have made this more believable and would have looked/worked better. Yet I won’t let this take away from what was achieved here today and I am thrilled with the reception it got and how it looked when displayed live in the environment.

A user interacting with my installation:

0

Creating the Installation 6

Fixing the two problems wasn’t as easy as I had hoped but it was necessary. Early on I diagnosed the problem for the multiple faces as a for statement  but removing this would cause an initialization error and cause Processing to crash. This got me very worried so I asked for help on this part. Advice that was given was to not copy the pupil code on the else statement that I had created for the no face detection but instead call them. This made me code a lot neater and more understandable. I believe this helped me figure it out and after a few days of tweaking and testing the code I had diagnosed the issue and it seemed to fix both my problems and made the project workable and in my eyes complete pending testing. However I did add code in to make the installation full screen so it looked better overall without the bars of the computer being displayed, I feel this makes the project more immersive.

In order to test I got two of my house mates to come and check it, with this I could confirm both issues were fixed and it allowed me to get feedback and genuine reactions on my project.

The feedback they gave me was very positive, they had fun with the project and moved their heads a lot to get the Mona Lisa to follow them. They laughed at the comedic set up that was placed on the project with the large eyes and I feel this worked in the project’s favour. The eyes being the size and style they were made it more appealing and in the opinion of my testers more enjoyable to interact with.

IMG_6374

My final project being displayed

0

Creating the Installation 5

The installation is really getting under way now and I have started modifying my code from the mouse test to include the face camera.

Initially I was a bit baffled with how to map it, I could get the eyes to appear when it detects a face but they wouldn’t move. Initially I tried to change face to a PVector but it wouldn’t convert from a rectangle. However defining the Vector and choosing the centre point of the face and then converting its location made them appear. Though with such a small camera it was always pointing to the top, I thought a quick fix for this would be changing the camera resolution and while this worked it wasn’t stable and would cause “lag”. To solve this I thought doing location * 6 would be a work around but after a few hours I couldn’t figure out how to implement this into the face tracking code. Eventually I looked at mapping and to my surprise it worked with relatively no hassle. The next problem I encountered was that my pupils weren’t appearing, I could tell by taking out the eye base that the pupils were moving. This then proved to be a simple problem to fix and was simply me drawing the eyes after the pupils as I called them in before I made the eyes. Moving the eyes code up to the top of void draw() fixed this.

I then decided to ask my house mate to test this version out, we noted that after a quick test the pupil doesn’t draw when no face is detected and that a pupil is drawn for each of the faces on the screen; causing multiple at times. This testing proved significant and I was happy these could be recognised before getting to the space.

Untitled-1

Disappearing eyes was one of the problems I encountered

0

Creating the Installation 4

Before I start modifying my code from mouse to face tracking I have worked on changing the image. I started by researching the Mona Lisa frame and wall that is currently used in real life. Like most gallery’s the wall used is a plain, light canvas so this will be easier to recreate with a few textures and a choice of the right colour. The frame on the other hand is the polar opposite and very complex and detailed as well as quite thick. For the real painting this wouldn’t be a problem but adding such a thick, detailed frame would mean for my digital version the eyes; in which are the main focus, will be very small and not as capturing to the audience. Due to this I have decided not to mimic the frame but instead go for quite a simplistic, gold frame that is thin.  I feel allowing the painting and the eyes to be larger will be more appealing and the frame won’t grab attention anyway.

A 1920×1080 resolution allows me to cater for the highest the monitor will be that it will be displayed on while easily scaling down without losing quality; in which scaling up will do. However In a 1920×1080 image there isn’t a lot of space to put very high detailed work and still have a focal point that is less than 100 pixels. Yet I have to work with where it will be displayed and the monitors aren’t huge so will be a maximum of 1080p.

monalisa

The new Mona Lisa background

0

Creating the Installation 3

My mouse tracking Mona Lisa is complete and it has been very helpful. The time I worked on it allowed me to  gain confidence in my project and grasp an understanding on how the face tracking installation will be achieved.

This testing with the mouse gave me a lot of information and granted me the ability to test how the installation would look once finished and on the whole I am very happy with how it reacts and when starting with my initial aim in mind it wasn’t far off what I had visualised.

Following the testing I  have come to the conclusions that a dual-monitor display wouldn’t look good so I would be better to “set a scene” in which would be a framed painting and a faux-wall. This would give my painting an environment that still positions it central but means I can use the whole screen.  I also have decided that the yes lack detail and are a bit too large, adding a stroke and changing the pupil size would give it more room to navigate on the screen and a stroke would give an “eye colour” making it more appealing visually.

With the mouse tracking I set up the eyes and the tracking to a point, this work means that it can be easily modified for the use with face tracking and as I know it works well a conversion to the faces would be easier than if I had just started to do faces from the start. While I did struggle initially to get the eyes to track the mouse pointer as I didn’t realise before void setup() I needed to determine vectors. However this was easy to fix once I had figured it out and the code was very simple too. Figuring out such a basic problem in a simpler code was a lot easier and therefore saved me a lot of time when coming to my final project that would have contained more complex code and would have been harder to determine.

Overall I am happy with how the project is panning out, thanks to my tutor’s suggestion I have managed to overcome a major hurdle of the project and see how the project would look in the long run. Due to this I have made some critical choices and changes that I feel will benefit the project in the long run

My mouse tracking project in action:

0

Creating the Installation 2

Today I had a discussion with my lecturer and he gave me very good advice. I said I wasn’t sure how to set up the face tracking and he explained about using vectors and suggested to try mouse tracking first to test my idea and see how it looks.

For mouse tracking he recommended looking at PVector’s in order to determine the point of the mouse and then limit the eyes’ movement to a pixel value that goes off of the mouse position. This made a lot of sense and the mapping/vector building should help in my final project and allow me to see how it would pan out if I did continue it.

0

Creating the Installation 1

Recently I have been looking at my installation and what I need. This has mainly been research up until now and design mock ups. With this I have found OpenCV library really helpful as there is a core face tracking code that can be used to start my project. This gives me a good, strong foundation to begin with however I must not get complacent as it is only a foundation and from a brief look I know that there are things needing to be changed – such as detecting only one face not multiple and finding midpoint of the face.

For the painting I have decided upon the Mona Lisa, the design choice behind this is that the painting is perhaps the most famous and recognisable in the World. Everyone knows about it and has seen it, they know it is a painting so isn’t digital and this is a core fundamental of my project as people need to know it is a painting made digital to understand the panopticon principle behind it.

I started by resizing the Mona Lisa image; with my plan of having it on two screens, and setting the scene with imported libraries, image loading and drawing the eyes. All these simple but important steps meant that I had a significant start going into the meeting with my lecturer in order to help with my track the faces; in which I tested had worked.

monalisa1 monalisa2 monalisa3

Mock ups of my project